Started 30th April 2012
This wine was mainly about using up some remaining fruit from the freezer. We had about 1lb of raspberries and I found about 8oz of loganberries in there too, so decided to use those with 1lb or so of redcurrants to make another wine.
This one is a bit random and we didn't bother much about the exact quantities - it might be great, it might be awful - only one way to find out!
We also re-used some of the pulp from previous raspberry and redcurrant wine - the pulp still contains yeast, so no need to add any more.
Raspberry, Loganberry & Redcurrant Wine
Step 1:
Put 1lb raspberries, 0,5lb loganberries, 1.5lb redcurrants into bucket
Crush fruit
Dissolve 2.5lb sugar in 3 pints of water and add to bucket
Add 1 teaspoon pectolase to help break down the fruit and extract flavour
Simmer 0.5lb (500g) currants in 3 pints of water for 30 mins and add to bucket
Add a lump of pulp from a previous batch of wine
Add 1 teaspoon yeast nutrient
Cover and leave for 1 week
Note - this wine uses the yeast that already exists in the lump of pulp from the previous batch
This wine contains a lot of pulp so has less than 1 gallon of liquid. When this is strained into the demijohn, it will need topping up with water.
Step 2:
Strain through a sieve into a demijohn
Top up to 1 gallon
Fit bung and airlock and leave to ferment.
Results So Far:
It's a lovely colour, lovely smell. Nowhere near a gallon in the demijohn, probably only 6 pints at best. Not sure if we should top up or not, but we've decided not to. Just need to wait and see what happens ....
Sunday, 29 April 2012
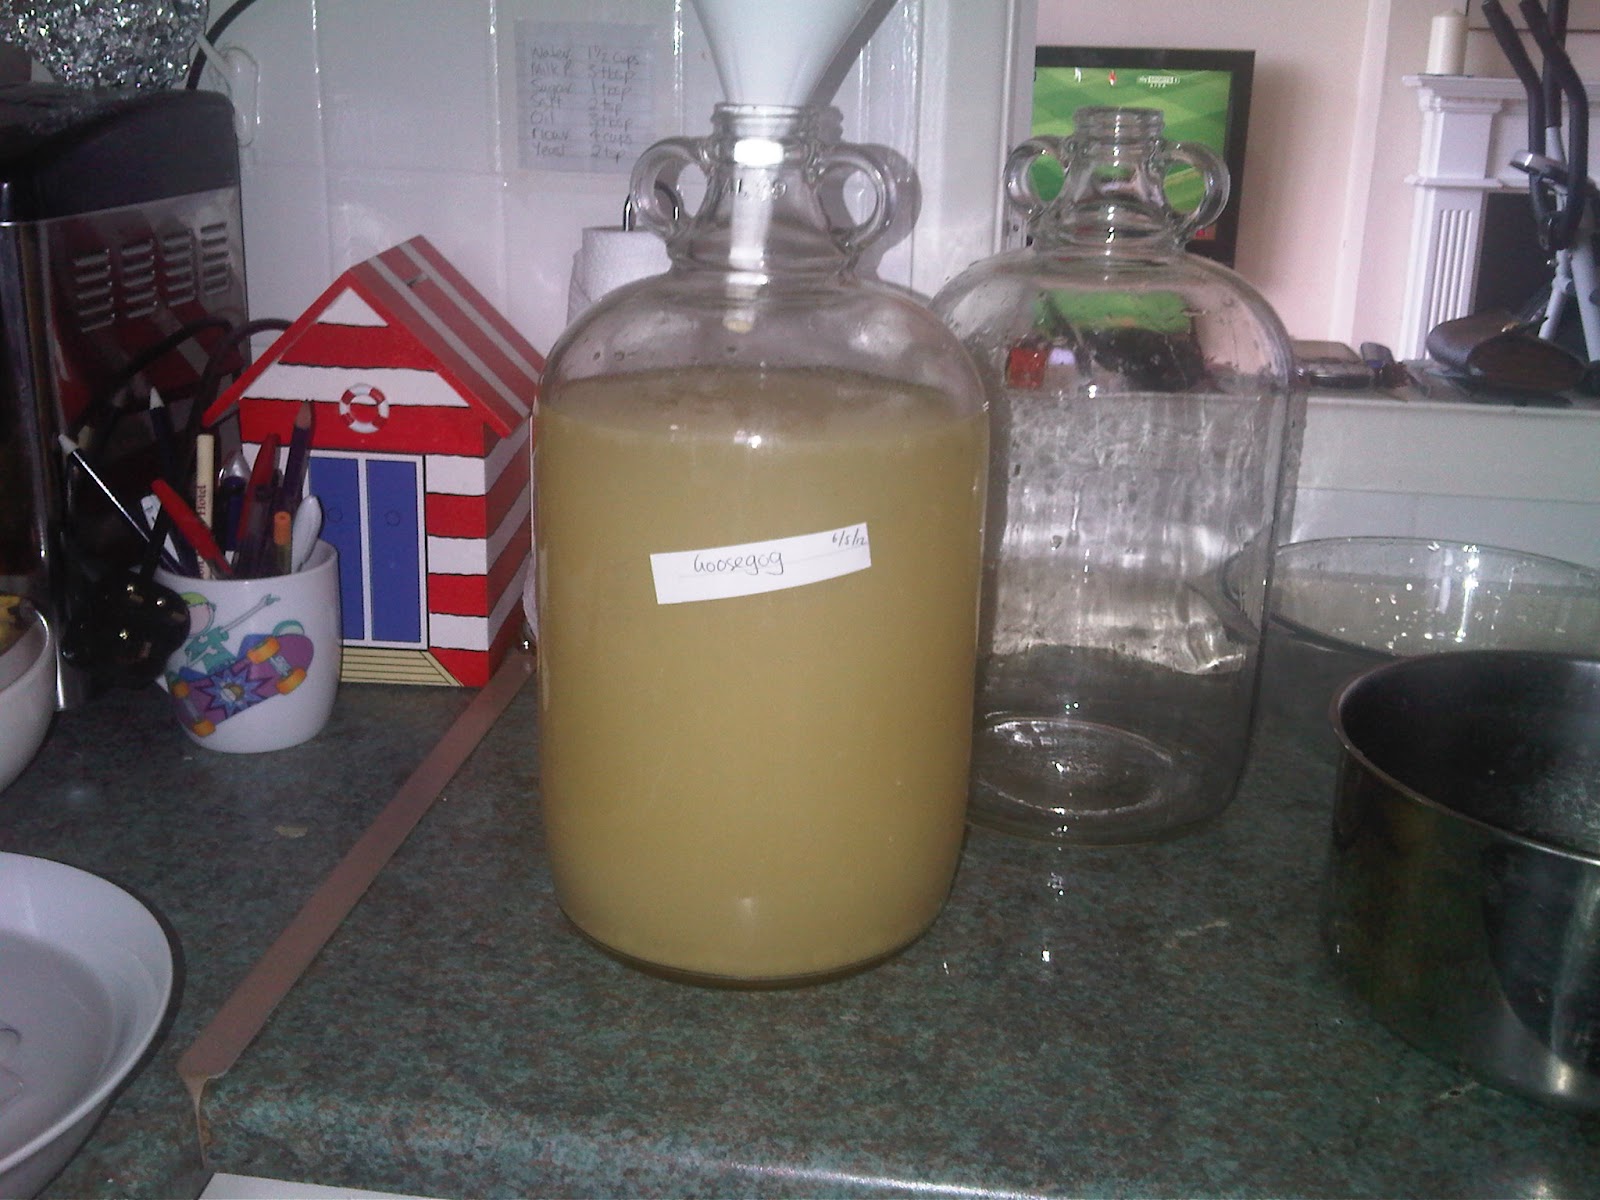
Gooseberry Wine 1
Started 30th April 2012
I'm not very keen on white wine, but the missus likes white wine in the summer. As we had about 16lbs of gooseberries in the freezer and loads of red wines started, we decided we should get some white wine on the go. Gooseberry wine seems to take a whole year to ferment and mature, so starting it now means it should be ready for next summer.
We used a slightly different method for the gooseberry wine. We crushed the gooseberries and soaked them in water for a week before straining and adding the sugar and yeast. This meant we were adding sugar and yeast to the fruit juice without the pulp. The idea was that firstly, without the fruit pulp, hopefully we could get a more precise specific gravity reading so we knew how much sugar to add, and secondly, that we'd have a full 1 gallon of liquid to transfer to the demijohns.
Gooseberry Wine 1
Step 1:
Top and tail 4lbs gooseberries into a bucket
Crush fruit
Add 1 teaspoon pectolase to break down the fruit and extract colour and flavour
Add 1 pint water
Cover and leave for 1 week, stirring and crushing again every couple of days
We used home grown gooseberries that we had picked last year and frozen. I've always found it easiest to top and tail gooseberries when they are frozen. Trying to top and tail ripe gooseberries can be very difficult - it's easy to squash them and make a mess. Frozen gooseberries don't get squashed and can be topped and tailed simply by scraping with a fingernail. The downside is cold fingers!
Step 2:
Strain the gooseberries through a sieve into another bucket. Squeeze the fruit pulp to get as much juice out as possible.
Dissolve 3lbs sugar in warm water and add to the gooseberry juice
Top bucket up to 4.5 litres (1 gallon)*
Test SG and add sugar if necessary to 1090
Add 1 teaspoon yeast nutrient
Add 1 teaspoon Champagne yeast
Cover and leave for a week
* At this stage, the SG reading was exactly 1090 - this is the ideal SG for starting wine - this is also the lowest SG reading we've had so far from our wines
Step 3:
Strain through sieve into demijohn
Top up to 1 gallon if required
Fit bung and airlock
Leave in demijohn for 6 months
Step 4:
Add finings to help clear the wine and leave for a week
Rack off into 2nd demijohn and leave for another 6 months *
We may want or need to use a filter at this stage, depending on how cloudy or hazy the wine is
Step 5:
Bottle and drink!
We're hopeful for this wine. It should be fairly dry, but we won't get to find out for another year ....
I'm not very keen on white wine, but the missus likes white wine in the summer. As we had about 16lbs of gooseberries in the freezer and loads of red wines started, we decided we should get some white wine on the go. Gooseberry wine seems to take a whole year to ferment and mature, so starting it now means it should be ready for next summer.
We used a slightly different method for the gooseberry wine. We crushed the gooseberries and soaked them in water for a week before straining and adding the sugar and yeast. This meant we were adding sugar and yeast to the fruit juice without the pulp. The idea was that firstly, without the fruit pulp, hopefully we could get a more precise specific gravity reading so we knew how much sugar to add, and secondly, that we'd have a full 1 gallon of liquid to transfer to the demijohns.
Gooseberry Wine 1
Step 1:
Top and tail 4lbs gooseberries into a bucket
Crush fruit
Add 1 teaspoon pectolase to break down the fruit and extract colour and flavour
Add 1 pint water
Cover and leave for 1 week, stirring and crushing again every couple of days
We used home grown gooseberries that we had picked last year and frozen. I've always found it easiest to top and tail gooseberries when they are frozen. Trying to top and tail ripe gooseberries can be very difficult - it's easy to squash them and make a mess. Frozen gooseberries don't get squashed and can be topped and tailed simply by scraping with a fingernail. The downside is cold fingers!
Step 2:
Strain the gooseberries through a sieve into another bucket. Squeeze the fruit pulp to get as much juice out as possible.
Dissolve 3lbs sugar in warm water and add to the gooseberry juice
Top bucket up to 4.5 litres (1 gallon)*
Test SG and add sugar if necessary to 1090
Add 1 teaspoon yeast nutrient
Add 1 teaspoon Champagne yeast
Cover and leave for a week
* At this stage, the SG reading was exactly 1090 - this is the ideal SG for starting wine - this is also the lowest SG reading we've had so far from our wines
 |
| Step 3 - lovely colour and smell |
Strain through sieve into demijohn
Top up to 1 gallon if required
Fit bung and airlock
Leave in demijohn for 6 months
Step 4:
Add finings to help clear the wine and leave for a week
Rack off into 2nd demijohn and leave for another 6 months *
We may want or need to use a filter at this stage, depending on how cloudy or hazy the wine is
Step 5:
Bottle and drink!
We're hopeful for this wine. It should be fairly dry, but we won't get to find out for another year ....
Blackberry Wine 2
After making the previous 4 gallons of blackberry wine, we had a lot of pulp in the buckets. We also had another 1lb of blackberries in the freezer. So we put the whole lot into the 15 litres bucket to make another 2 gallons of blackberry wine.
Blackberry Wine Recipe 2
Step 1:
Dissolve 5lbs sugar in warm water (do in smaller batches, like 2lbs in 3 pints of water) and add to 15 litre (3 gallon) bucket
Top up bucket to 10 litres (2 gallons) with cold water
Crush 1lb blackberries in small bucket and add to 15 litre bucket
Add 1 teaspoons yeast nutrient
Add pulp from previous 4 gallons of blackberry wine and stir well
Cover and leave for one week
 |
| Blackberry Wine 2 |
Strain through sieve into cleaned, sterilised demijohns
Fit bung and airlock to demijohn
Leave to ferment for a few weeks (maybe 6)
Result so far ....
Looks like it worked quite well. Putting the liquid in the bucket first meant we got a full 2 gallons in the demijohns and no need to top up with water. There was loads of pulp, all squeezed out to get as much juice as possible.
More Winemaking Kit
Last week we were offered some winemaking kit - lots of it - by a nice old chap called Ron. He had given up winemaking years ago and all his kit was stacked up in his loft doing nothing. We were very grateful for it!
I can't list everything, but among the items were:
7 or 8 buckets (up to 5 gallon)
17 demijohns
dozens of bottles
fermenting cabinet (for 3 demijohns)
5 or 6 immersible heaters
2 filters
loads of tubing, bungs, airlocks, corks, 2 corking machines
loads of campden tablets and sterilising solution
and more ....
The car was full!
We had a bit of a sort out when we got home. We now have 1 bucket with all our main kit, the things we'll use regularly, like one tube, hydrometer, airlocks, yeasts, chemicals etc. We have another bucket with spare kit that we won't normally need. The filter kit is now in a 3rd bucket and the bottling / corking equipment is in a 4th bucket.
Also in the kit he gave us were his winemaking logs from years ago - some records were from back in the 1960's! The missus loves these and we're going to look after them and maybe follow some of the recipes.
To say thanks, we'll be dropping some wine off to Ron sometime soon. It would be nice to send him some homebrew, although we don't want to risk delivering something that turns out to be undrinkable, so we might buy some instead ....
Raspberry & Redcurrant Wine 1
Started 23rd April 2012
We had 3lbs of redcurrants and another 2 or 3lbs of raspberries in the freezer. We didn't really fancy a pure redcurrant wine so thought we'd go for a mix of raspberries and redcurrants. We decided to re-use a little bit of the pulp from the previous raspberry wine as that already has yeast in.
Raspberry & Redcurrant Wine Recipe 1
Step 1:
Crush 2lbs raspberries and 1lb redcurrants in a 5 litre bucket
Add 1 teaspoon of pectolase to break down the fruit and extract flavour and colour
Dissolve 2.5lb sugar in 5 pints of water and add to bucket
Add 1 teaspoon yeast nutrient
Top up bucket to 4.5 litres (1 gallon) with cold water
Test SG and add sugar to bring up to 1090*
Put in airing cupboard to ferment for 7 days
* The hydrometer floated quite high, SG reading about 1135, so (from what I'd read) it didn't need any more sugar
Step 2:
Strain the liquid into a cleaned, sterilised demijohn
Fit bung and airlock to demijohn
Leave to ferment for a few weeks (maybe 6)
Result so far ....
This is another that looks good, looks like it'll clear well. The airlock is blipping away nice and steadily.
We had 3lbs of redcurrants and another 2 or 3lbs of raspberries in the freezer. We didn't really fancy a pure redcurrant wine so thought we'd go for a mix of raspberries and redcurrants. We decided to re-use a little bit of the pulp from the previous raspberry wine as that already has yeast in.
Raspberry & Redcurrant Wine Recipe 1
Crush 2lbs raspberries and 1lb redcurrants in a 5 litre bucket
Add 1 teaspoon of pectolase to break down the fruit and extract flavour and colour
Dissolve 2.5lb sugar in 5 pints of water and add to bucket
Add 1 teaspoon yeast nutrient
Top up bucket to 4.5 litres (1 gallon) with cold water
Test SG and add sugar to bring up to 1090*
Put in airing cupboard to ferment for 7 days
* The hydrometer floated quite high, SG reading about 1135, so (from what I'd read) it didn't need any more sugar
Step 2:
Strain the liquid into a cleaned, sterilised demijohn
Fit bung and airlock to demijohn
Leave to ferment for a few weeks (maybe 6)
This is another that looks good, looks like it'll clear well. The airlock is blipping away nice and steadily.
Blackberry Wine 1
Started 23rd April 2012
We had about 10lbs of blackberries in the freezer from last year so they were next on the list for the wine. This time, we decided to go for a bigger 3 gallon / 15 litre bucket - that should be enough for 18 bottles. Why make small buckets (which give 6 bottles at a time) when we can make much more in the same time?!
The method here is slightly different to the raspberry wine recipes in that we put everything in the bucket on the same day and just let it do it's thing.
Blackberry Wine Recipe 1
Step 1:
Crush 9lbs blackberries in a 3 gallon bucket
Dissolve 7.5lbs sugar in warm water (do in smaller batches, like 2lbs in 3 pints of water) and add to the bucket
Add 3 teaspoons pectolase to help extract flavour and colour
Add 3 teaspoons yeast nutrient
Add 3 teaspoons red wine yeast
Cover and leave for one week then strain into demijohns
We did take an SG reading before adding the yeast, but can't remember the reading - whatever the reading was, it was ok as we carried on.
The mixture frothed up quite well - too well in fact - so after 2 days, we decided to take some out and put it in a 1 gallon / 5 litre bucket. The downside was that we couldn't guarantee the quantities of fruit / sugar etc in the amount removed being the ideal proportions. But hey ho, worth taking a chance!
Step 2:
Strain through sieve into cleaned, sterilised demijohns
Top up with cold water to the "shoulder" of the demijohn
Fit bung and airlock to demijohn
Leave to ferment for a few weeks (maybe 6)
Result so far ....
We strained both buckets into the demijohns. We filled 3 demijohns and the 4th needed about 1 pint of water to top up. They are a lovely dark red, hopefully will clear nicely. We have labelled the 4th demijohn so we know at bottling time if it tastes much different to the other 3 demijohns.
New Shelving Unit
The same day that we started our first wines, we took a trip out to look for a new cooker. On the way, we stopped in a couple of charity shops.
And there is was - the perfect solution to shelving for the demijohns! A tubular steel framed unit with thick glass shelves. It's just the right size to stand behind the stationary cupboard in the home office, and open ended so easy to put demijohns into.3 shelves will hold 9 demijohns each, with a bit of room for ingredients and other bits. There's room underneath for all our equipment and more demijohns.
The unit was delivered the same day. Result!
I then spent a couple of hours emptying the office so I could set the shelving unit up .... and then putting all the junk back in the office until I get round to putting it all in the loft ....
Raspberry Wine 2
Started 14th April 2012
This is our second batch of wine, started 2 weeks ago, so a bit of catching up to do with the record keeping.
This is similar to batch 1, except using currants instead of grape concentrate. Currants are made from Corinth grapes and are a lot cheaper than the grape concentrate
Raspberry Wine Recipe 2
Step 1:
Crush 3lb raspberries in a 5 litre (1 gallon) bucket
Add 1 teaspoon of pectolase to break down the fruit and extract flavour and colour
Add 2.5lb sugar
Cover tightly, leave for 24 hours
Step 2:
Simmer 500g pack of Sainsburys Basics Greek Currants in 3 pints of water for 30 mins
Allow to cool and add to bucket
Then add:
1 teaspoon yeast nutrient
1 teaspoon wine yeast
Top up bucket to 4.5 litres (1 gallon) with cold water
Test SG and add sugar to bring up to 1090*
Put in airing cupboard to ferment for 7 days**
* The hydrometer floated quite high, SG reading about 1130, so (from what I'd read) it didn't need any more sugar
** 5 days should have been enough, but it's a weekend thing for us, so we just left it for 7 days
Step 3:
Strain the liquid into a cleaned, sterilised demijohn
Top up with cold water to the "shoulder" of the demijohn
Fit bung and airlock to demijohn
Leave to ferment for a few weeks (maybe 6)
Result so far ....
It looks good, nice red colour, but I'd describe it as cloudy. The airlock is blipping nicely, but at half the rate of the first raspberry wine.
Step 4:
Rack off into clean, sterilised demijohn
Add 1 crushed campden tablet
Add 1tsp potassium sorbate to stop the ferment
Shake well
Fit airlock and leave for 2 or 3 weeks to degas, giving it a gentle shake every couple of days.
Results now ... A very strong raspberry flavour, and very sweet. Should have tested SG before stopping the ferment. SG after stopping the ferment was 1015, so it's quite sweet - it could have continued fermenting a bit longer, which would have made a stronger, dryer wine.
Step 5:
Bottle - Bottled 19th July 2012
Verdict:
This is a really nice, sweet wine - a dessert wine. The strong raspberry flavour has mellowed. Definitely one to make again.
The reason this is sweeter than Raspberry Wine 1 is that we used currants instead of grape juice. The currants have twice as much sugar as the grape juice. We could have either used a little bit less sugar, or left the wine to continue fermenting a bit longer.
This is our second batch of wine, started 2 weeks ago, so a bit of catching up to do with the record keeping.
This is similar to batch 1, except using currants instead of grape concentrate. Currants are made from Corinth grapes and are a lot cheaper than the grape concentrate
Raspberry Wine Recipe 2
 |
| Raspberry wine 2 |
Crush 3lb raspberries in a 5 litre (1 gallon) bucket
Add 1 teaspoon of pectolase to break down the fruit and extract flavour and colour
Add 2.5lb sugar
Cover tightly, leave for 24 hours
Step 2:
Simmer 500g pack of Sainsburys Basics Greek Currants in 3 pints of water for 30 mins
Allow to cool and add to bucket
Then add:
1 teaspoon yeast nutrient
1 teaspoon wine yeast
Top up bucket to 4.5 litres (1 gallon) with cold water
Test SG and add sugar to bring up to 1090*
Put in airing cupboard to ferment for 7 days**
* The hydrometer floated quite high, SG reading about 1130, so (from what I'd read) it didn't need any more sugar
** 5 days should have been enough, but it's a weekend thing for us, so we just left it for 7 days
 |
| Raspberry wines 1 & 2 - this one is on the right |
Strain the liquid into a cleaned, sterilised demijohn
Top up with cold water to the "shoulder" of the demijohn
Fit bung and airlock to demijohn
Leave to ferment for a few weeks (maybe 6)
Result so far ....
It looks good, nice red colour, but I'd describe it as cloudy. The airlock is blipping nicely, but at half the rate of the first raspberry wine.
Step 4:
Rack off into clean, sterilised demijohn
Add 1 crushed campden tablet
Add 1tsp potassium sorbate to stop the ferment
Shake well
Fit airlock and leave for 2 or 3 weeks to degas, giving it a gentle shake every couple of days.
Results now ... A very strong raspberry flavour, and very sweet. Should have tested SG before stopping the ferment. SG after stopping the ferment was 1015, so it's quite sweet - it could have continued fermenting a bit longer, which would have made a stronger, dryer wine.
Step 5:
Bottle - Bottled 19th July 2012
Verdict:
This is a really nice, sweet wine - a dessert wine. The strong raspberry flavour has mellowed. Definitely one to make again.
The reason this is sweeter than Raspberry Wine 1 is that we used currants instead of grape juice. The currants have twice as much sugar as the grape juice. We could have either used a little bit less sugar, or left the wine to continue fermenting a bit longer.
Raspberry Wine 1
Started 14th April 2012
This is our first batch of wine, started 2 weeks ago, so a bit of catching up to do with the record keeping.
Raspberry Wine Recipe 1
Step 1:
Crush 3lb raspberries in a 5 litre bucket
Add 1 teaspoon of pectolase to break down the fruit and extract flavour and colour
Add 2.5lb sugar
Cover tightly, leave for 24 hours
Step 2:
245ml tin of red grape concentrate
1 teaspoon yeast nutrient
1 teaspoon wine yeast
Top up bucket to 4.5 litres (1 gallon) with cold water
Test SG and add sugar to bring up to 1090*
Put in airing cupboard to ferment for 7 days**
* The hydrometer floated quite high, SG reading about 1135, so (from what I'd read) it didn't need any more sugar
** 5 days should have been enough, but it's a weekend thing for us, so we just left it for 7 days
Step 3:
Strain the liquid into a cleaned, sterilised demijohn
Top up with cold water to the "shoulder" of the demijohn
Fit bung and airlock to demijohn
Leave to ferment for a few weeks (maybe 6)
Result so far ....
It looks good, looks like it'll become a really clear wine, deep red colour. The airlock is blipping nicely.
Step 4:
Rack off into clean demijohn
Add 1 crushed campden tablet
Add 1tsp potassium sorbate to stop the ferment
Shake well to mix and degas
Fit airlock and leave alone for 2 or 3 weeks to degas - give the demijohn a gentle shake every couple of day.
Results now .... Tastes good, strong raspberry flavour, a bit like pure raspberry juice, but alcoholic. Tested SG at this point - reading of 0.990, so it's a fairly dry wine. Should have tested SG sooner - must get into the habit of testing SG before racking off and stopping the ferment.
Step 5:
Bottle - Bottled 19th July 2012
Verdict:
The flavour has mellowed, it's not such a strong raspberry flavour, really nice wine now. This is definitely one we'll make more of.
This is our first batch of wine, started 2 weeks ago, so a bit of catching up to do with the record keeping.
Raspberry Wine Recipe 1
 |
| Raspberry wine with grape concentrate |
Crush 3lb raspberries in a 5 litre bucket
Add 1 teaspoon of pectolase to break down the fruit and extract flavour and colour
Add 2.5lb sugar
Cover tightly, leave for 24 hours
Step 2:
245ml tin of red grape concentrate
1 teaspoon yeast nutrient
1 teaspoon wine yeast
Top up bucket to 4.5 litres (1 gallon) with cold water
Test SG and add sugar to bring up to 1090*
Put in airing cupboard to ferment for 7 days**
* The hydrometer floated quite high, SG reading about 1135, so (from what I'd read) it didn't need any more sugar
** 5 days should have been enough, but it's a weekend thing for us, so we just left it for 7 days
Step 3:
Strain the liquid into a cleaned, sterilised demijohn
Top up with cold water to the "shoulder" of the demijohn
Fit bung and airlock to demijohn
Leave to ferment for a few weeks (maybe 6)
Result so far ....
It looks good, looks like it'll become a really clear wine, deep red colour. The airlock is blipping nicely.
Step 4:
Rack off into clean demijohn
Add 1 crushed campden tablet
 |
| Raspberry wines 1 & 2 - this one is on the left |
Shake well to mix and degas
Fit airlock and leave alone for 2 or 3 weeks to degas - give the demijohn a gentle shake every couple of day.
Results now .... Tastes good, strong raspberry flavour, a bit like pure raspberry juice, but alcoholic. Tested SG at this point - reading of 0.990, so it's a fairly dry wine. Should have tested SG sooner - must get into the habit of testing SG before racking off and stopping the ferment.
Step 5:
Bottle - Bottled 19th July 2012
Verdict:
The flavour has mellowed, it's not such a strong raspberry flavour, really nice wine now. This is definitely one we'll make more of.
In The Beginning ....
I first tried the home brew many years ago when I was about 18. It was beer and it was flat and crap.
25 years later, I'm having another go, but this time with wine. Im older and (in theory) wiser, rarely drink beer these days, love a drop of red wine. The missus loves a gallon or three of red wine too.
Best of all, we're both really into growing our own fruit and veg and the winemaking, so hopefully we'll have gallons and gallons of top notch home brew!
Subscribe to:
Comments (Atom)